Wednesday, October 29, 2008
Tuesday, October 28, 2008
Kitchen Tip Tuesdays

My tip today is for seasoning your cast iron pans.
I have had a wonderful cast iron dutch oven for years, but because of not being seasoned properly, it was delegated to the back corner in a cabinet. When cast iron pans aren't seasoned properly, they rust & can make the food taste like metal. My dad gave me the dutch oven so many years ago I don't even remember when! I tried to season it, but really didn't know how. And that was back before internet, so I didn't have the world of info at my fingertips like I do now. LOL I found this pan when I was searching for more storage space for all of our home canned jars. I was running out of storage space! When I found this pan I just sat & held it & remembered my dad giving it to me so long ago. I decided that it was such a shame to have it tucked away & I determined to figure out how to season it & USE it.
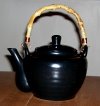
Here are my 3 cast iron pans. On the left is my 8 inch dutch oven & just above it is the lid that doubles as a little frying pan. This is "new" but given to me...guessing here...about 20 years ago. The large pan is a big 12 skillet that my m-i-l gave me years ago. It was one of hers, & there's no telling how old it is. It is already seasoned. I don't think you can really tell by the picture, but the surface is smooth.

The dutch oven looks shiny because it has been oiled, not because it it seasoned.
So, onto the how to....
I've looked over many websites about how to do this. There are quite a bit of variations, but it basically all boils down to the same technique.
1. Clean your cast iron pan really well. If there is rust on it, use a scouring pad or even steel wool to get it out. You MUST remove the rust. You can use nice soapy hot water too.
2. Dry pan really well, or it will rust again. You can even set it on a hot burner for 1 minute to make sure it has dried. I do this everytime I use mine.
3. Rub crisco all over the cooking surface of your pan. I learned to not use liquid oil as it can get gummy in the seasoning process. Also, rub it in with your fingers & not a paper towel. Even though some sites say to use a paper towel, I was finding paper towel fibers embeded in the 'oil layer' in my pan.
4. Cover the bottom rack in your oven with foil.
5. Turn your oven on to 350 & place pans upside down on middle rack. Bake for 1 hour.
6. Turn off oven & leave pans in the oven to cool down.
7. Remove pans from the oven & rub any excess oil from your pans with a soft cloth or paper towels. (it didn't seem to leave fibers in this step)
And that's it. Your pan is seasoned. But it's not forever. You may need to do this a few times.
I actually read that the best way to season your pans is to use them often. I have used my dutch oven a lot in the last 2 months. After I've washed & dried it, I rub a thin layer of crisco inside it.
Now, there are differences of opinion on how to clean them. There are folks out there that swear you should never use soap on them after the first time you clean them. I've tried that, but it just gives me the willies, actually. LOL I mean, I put RAW hamburger in it! Well, I read on one site that the "no soap rule" came about from years & years ago....when there was LYE in soap. And the lye would strip off the seasoned layer. But today's soap isn't that strong, & I read that it will NOT hurt the pan...as long as you're not using homemade LYE soap. LOL So I do use just a teeny-tiny bit of soap & some really hot water. And more importantly, ***dry it thoroughly***. Rub a little crisco in it, & use that pan a lot!
Ok, I've written enough. LOL Here are some of the links I used to learn about seasoning cast iron pans:
This site has tons of info on cast iron pans.
This site is on seasoning & caring for cast iron pans.
I also wanted to show you something. It's kind of an update on last week's Kitchen Tip Tuesday on keeping fresh herbs fresh. As I was taking pictures of my pans, I looked over at my parsley & thyme in the 'vase'. I realized that it's been exactly a week. I promise, this is the SAME batch of parsley & thyme that I took pictures of last week! The only difference is that there is a little less of both herbs because I've used just a little this week. Just LOOK at how FRESH they still are! They have been in this glass of water for 1 full week!

You can read more Kitchen Tip Tuesdays over at Tammy's site.
Monday, October 27, 2008
Roast, Potatoes & Carrots
This is one of my all time FAVORITE meals!  I don't really have a recipe for my roast.
I brown in all sides in a skillet. I usually brown it in bacon grease, but canola oil is fine.
Then place it in a large crockpot. Add potatoes, carrots, onion, garlic, salt, & pepper. I usually add a cup or so of water. You can add any seasonings you want. I cook this all day on low. Sometimes I don't add potatoes so we can have mashed potatoes instead.
And on this day we had sliced tomatoes to go with it, so it made it a perfect meal!
I don't really have a recipe for my roast.I brown in all sides in a skillet. I usually brown it in bacon grease, but canola oil is fine.
Then place it in a large crockpot. Add potatoes, carrots, onion, garlic, salt, & pepper. I usually add a cup or so of water. You can add any seasonings you want. I cook this all day on low. Sometimes I don't add potatoes so we can have mashed potatoes instead.
And on this day we had sliced tomatoes to go with it, so it made it a perfect meal!
Friday, October 24, 2008
Friday Felicities

Today my Friday Felicites are based on the fact that I am sick. My throat hurt so bad this morning that it felt like there were swords stuck in there. I can feel the cold coming...my head is filling up. :(
Really hot tea with honey. The whole pot!
Soft kleenix
A really hot bowl of tomato soup.
Finishing a reallly good book: The Yada Yada Prayer Group Gets Down (it's book 2).
Really hot tea with honey. The whole pot!
Soft kleenix
A really hot bowl of tomato soup.
Finishing a reallly good book: The Yada Yada Prayer Group Gets Down (it's book 2).
A second bowl of tomato soup. LOL
Crockpot Lasanga! I made it yesterday, so it's left overs tonight & I don't have to cook!
So thankful that it's FRIDAY!!!
And last but not least, not having anything to do with being sick...
Making Autumn Place Mats in art with 5 year old ds. :)
You can see more Friday Felicities at Becky's Site.
Crockpot Lasanga! I made it yesterday, so it's left overs tonight & I don't have to cook!
So thankful that it's FRIDAY!!!
And last but not least, not having anything to do with being sick...
Making Autumn Place Mats in art with 5 year old ds. :)
You can see more Friday Felicities at Becky's Site.
Wednesday, October 22, 2008

Tuesday, October 21, 2008
Kitchen Tip Tuesdays

My tip this week is for keeping freshly cut herbs fresh.
To keep them fresh, put them in a glass of water, just like you would freshly cut flowers. This picture is from yesterday. I picked too much flat leaf parsley & a little too much thyme. They are sitting on my counter even now, as fresh as when I picked them yesterday.

To keep them fresh, put them in a glass of water, just like you would freshly cut flowers. This picture is from yesterday. I picked too much flat leaf parsley & a little too much thyme. They are sitting on my counter even now, as fresh as when I picked them yesterday.
I found this hint this summer while I was checking different sites to learn more about herbs.
You should do this with herbs you buy at the store too. You can also lightly wrap the top part with plastic wrap & store it in the frig. I got to the point I would NOT buy herbs in the store because half the time they'd go bad before I even used them. So if you buy herbs in the store, take them out of the package & put them in a glass of water, lightly cover in plastic wrap, & store in the frig.
I'm using fresh out of the garden, but sometimes (a lot of times, lol) I pick too many. So I have been doing this trick. But, I just kept the parsley out on the counter in the 'vase', & it stayed fresh, I'm not kidding, for TWO WEEKS! I changed the water a few times, but that's all I did. Really.
Try this trick, you'll be glad you did.
You can see more tips at Tammy's site.
Friday, October 17, 2008
Friday Felicities

5 year old reading to me from his reader
Cool Fall weather
Turning leaves
Getting ready to make the first homemade vegetable soup of the season
Homemade bread to go with the soup
FRIDAYS
WEEKENDS!!!
See more Friday Felicities at Becky's.
Cool Fall weather
Turning leaves
Getting ready to make the first homemade vegetable soup of the season
Homemade bread to go with the soup
FRIDAYS
WEEKENDS!!!
See more Friday Felicities at Becky's.
Wednesday, October 15, 2008
Wordless Wednesday....with words
I thought I would show you our big maple tree. As far as maple trees go, this one is still consdered young. It's not at peak yet, but it has started to change. You can also see that some leaves have already fallen!
 Our morning glories are still going strong!
Our 17 year old dd planted a 59 cent package of seeds & this is what we got!
We have had a lot of fun watching them take over our front porch.
Our morning glories are still going strong!Our 17 year old dd planted a 59 cent package of seeds & this is what we got!
We have had a lot of fun watching them take over our front porch.

And here's a volunteer something or other. I have no idea what it is.
But it's purty.

Tuesday, October 14, 2008
Kitchen Tip Tuesdays

My Kitchen tip this week is drying herbs.
First, I have to say, that I took this picture just so I could say....
"If I could save Thyme in a bottle".....Sorry. LOL I could not help myself!

In that picture you can also see the dill seed that I have saved. And the tomatoes are still comin'. You can see that they are not as high quality, but after 4 or 5 really HUGE pickins', it's a big blessing that they are even still producing!
I have to admit that I am brand new to herb drying. So if anyone sees any glaring mistakes, please correct me.
To dry herbs, tie them up in small bundles like this picture.
I have here 3 bundles of parsley, 3 bundles of thyme, & 2 bundles of basil.
 Next, take small brown paper bags & 3-hole punch them for air holes. Be sure to write on the bag which bundle you will put in it. Place one bundle in each bag & tie it closed. Now you can hang them up to dry.
 Some other herbs I did not put in bags because the bundles were BIG.
 That would be for the dill & the corriander. I did tie them in bundles & let them dry on a sheet on a table. I have already picked all of the dill seed, & it filled a half pint jar (1st picture next to the thyme in the bottle *snicker*). Hey, a half pint of dill seed is a bunch! It took me what seemed like forever to pick them all!
And here are the corriander seeds, mostly still in the bundles.
 Those seeds are tiny. I really hope to get them done by the end of this week. I have a pint jar already more than half full.
The herbs I bagged above are still not dry, as I only bagged them a couple weeks ago.
I did some sage, peppermint, & spearmint more than a month ago so I checked them a few minutes ago to see if they're ready. You really can't tell by this picture, but they seem to be completely dry.
Here is one bundle of sage & one bundle of peppermint:

I picked the sage leaves off the stem & put them in a jar. I read somewhere that you should leave the leaves intact instead of crumbling them to put in the jar. They retain their flavor longer if you put them in your jar as whole leaves. Then you can crumble them when you are ready to put them into your cooking.
I will probably leave the lid off this jar for a while, just to make sure they really are completely dry. If you put a lid on & there is still moisture, they will mold.
I bet some of the sage from this jar of dried sage leaves will be used in dressing on Thanksgiving!

I put the peppermint back into its bag, because I have to find some more jars.
I think I may have a half pint jar in the dishwasher, because we finished off another jar of green pepper jelly today. LOL But frankly, we've never been this low on jars! I think I've canned more this year than ever.
I think half pints might be best for the seeds we've harvested, but the dried herbs may be better housed in pint jars. That jar with the sage is a half pint, & one bundle filled it. I think I have 4 more bundles of sage drying in bags, so I'm gonna need a bigger jar. ("We're gonna need a bigger boat.")
Also, a note on the basil. I'm not sure how well it dries, because when I see it mentioned online, mostly people put it in the food processor with olive oil, & then freeze it in ice cube trays to store in the freezer. I may try that, but I was assuming that is to use to make pesto. I've only had pesto once in my life. It was the nastiest stuff I think I've ever tasted! It was years ago at a restaurant, on a mushroom sandwich. I do love basil on my tomatoes, so I'm wondering if maybe that day their pesto happened to be bad? Maybe I do like it but don't know it because of that experience? Maybe I'll try it again sometime. But for now, I'm drying mine.
To see more Kitchen Tips Tuesdays please visit Tammy's site.
And now, I'm off to find a certain song to put on my playlist. It's just perfect for this post!
ROTFLOL! Turn your volume up so you can hear it!
(P.S. I have since removed the Time in a bottle song..lol )
Saturday, October 11, 2008
Orange-Pineapple Ice Cream
It's been a while since I posted an ice cream recipe.
Here's one that comes from an old, very yellowed recipe card. This recipe is from my Aunt Nora.

Here's one that comes from an old, very yellowed recipe card. This recipe is from my Aunt Nora.
Orange-Pineapple Ice Cream
2 C. milk
2 C. strained orange juice
2 C. pineapple juice
1/4 C. cornstarch
1/3 C. flour
5 eggs, separated
2 C. sugar
1/2 t. salt
2 T. vanilla ( I used less)
4 C. cream
Mix flour, cornstarch, sugar, & salt, set aside.
Beat egg yolks, add milk & juices. Stir this a little at a time into the flour mixture.
Cook until thick. Add vanilla & cool. Strain if lumpy. (Mine wasn't lumpy, but I did strain it anyway. I was glad I did as I got 7 or 8 little white slimy looking things...it was just cornstarch things, but it was good to get them out.) Cool completely & then pour into large ice cream freezer. Add cream & beaten egg whites. Crank freezer for about 20 minutes. If you have an electric freezer, finish according to your ice cream freezer's directions.
We tried this for the first time this week. Oh my. It is SO GOOD. The orange-pineapple gives it such a refreshing taste. And of course the milk & cream give it an unbelievable creamy texture & taste.
This goes to near the top of my favorites list.
We had this snack this afternoon with this ice cream.
 This might just be called divine.
Wednesday, October 8, 2008
Grilled Stuffed Peppers
This is what it looks like every time we pick peppers.
We probably pick once a week or so.
And this is why I have to freeze them or make green pepper jelly.
 I found this recipe on a blog called Calendula & Concrete. For some reason I can't direct link to the pepper recipe, so if you scroll down it is the third (I think) post.
I used green bell peppers & sweet bananna peppers. But I'm telling you right now, I did NOT like the taste of the bananna peppers roasted. The flavor was just...gross. So it was a good thing I only grilled a few of those. LOL
So, grill your peppers until blackened on all sides. Here's a picture of mine just starting out on the grill.


We probably pick once a week or so.
And this is why I have to freeze them or make green pepper jelly.
 I found this recipe on a blog called Calendula & Concrete. For some reason I can't direct link to the pepper recipe, so if you scroll down it is the third (I think) post.
 I used green bell peppers & sweet bananna peppers. But I'm telling you right now, I did NOT like the taste of the bananna peppers roasted. The flavor was just...gross. So it was a good thing I only grilled a few of those. LOL
So, grill your peppers until blackened on all sides. Here's a picture of mine just starting out on the grill.
Grill until completely blackened. Remove them from the grill & place in a paper bag & put in the freezer for 10 minutes. This helps in removing the skins. Actually, I guess I wouldn't know, because I was in a hurry & skipped this part. LOL
Remove the outer skin, it should come off easily.
Slice the peppers open & remove the seeds.
In a bowl, combine:
A few cups of fresh corn. I used our freezer corn, but it would be really cool to use fresh corn on the cob & grill that too!
1 C. Monterey Jack Cheese (I also added some cheddar)
I onion, diced
cilantro
salt & pepper to taste
Fill the peppers with this mixture, & place into a casserole dish. I had corn mixture left over, so I added it to the corner of the pan. Bake at 350 until heated through, about 10-15 minutes.
There's the extra corn in the bottom right hand corner of the pan.
And the banana peppers in the bottom left corner of the pan. Those went into the trash. yuk.
Tuesday, October 7, 2008
Kitchen Tip Tuesdays
 My tip this week involves green peppers.
Thankfully, most years, we have an over abundance of green peppers.
I hate to waste them, so besides using fresh green peppers often in my cooking, I share with friends & family. Also, now I've found the new recipe for Green Pepper Jelly. (oh my goodness...YUM!) But I still usually have loads of green peppers. So I chop them & freeze them.
My trick for freezing them, I'm sure everybody already knows, but I couldn't think of another tip. LOL
I dice them & then spread them out on a cookie sheet & put them in the freezer until frozen firm.
When they are frozen, I uses a spatula to remove them from them from the frozen cookie sheet, & put them into a ziplock bag, & then store the bag in the freezer.
The first year I did this years ago, I just dumped them in a bag & froze them. Of course they became a large mass of frozen green pepper. That didn't work so well. But freezing them like this, keeps them seperated. I can reach in & get a handful for any recipe during the winter. I really don't like having to buy those waxy things they sell in the stores in the winter. Yuk.  This year, for the first time, I have frozen a few bags in longer, thin strips.
Sometimes when we have sandwiches (like steak sandwiches or sausage sandwiches)
I saute green pepper & onions in olive oil. So I thought it would be nice to have some frozen like this.
 You can see more Kitchen Tip Tuesdays here at Tammy's site.
This year, for the first time, I have frozen a few bags in longer, thin strips.Sometimes when we have sandwiches (like steak sandwiches or sausage sandwiches)
I saute green pepper & onions in olive oil. So I thought it would be nice to have some frozen like this.
You can see more Kitchen Tip Tuesdays here at Tammy's site. Wednesday, October 1, 2008
Meatball Sandwich
Look at this meatball sandwich!!! YUM!

I love to find new recipes that are KEEPERS, & I love to find new food blogs to follow. I found both with this meatball sandwich. I found this at For the Love of Cooking. Pam takes the most beautiful pictures of food that I think I have ever seen! Plus, her food doesn't just look good, it tastes good. Here is the link to her Meatball Sandwich. There is no way that my picture even comes close to doing this sandwich justice. Y'all have to know that I am not a photographer. LOL So please go look at Pam's. :)
Meatball Sandwich from Pam at For the Love of Cooking
Mushroom Marinara:
2 tsp olive oil
1/2 sweet yellow onion, diced
6 oz of button or cremini mushrooms, sliced thinly
3-4 cloves of garlic, chopped finely
1 28 oz can of crushed tomatoes
1 15 oz can of tomato sauce
1 tsp balsamic vinegar
1 tbsp fresh parsley, chopped
1 tsp dried basil
1 tsp dried oregano
1 tsp fennel seeds, crushed
1 tsp white sugar
1 pinch of red pepper flakes
Sea salt and fresh cracked pepper to taste
Heat the olive oil in a dutch oven over medium heat. Add the onions and mushrooms and saute until tender; add the garlic and cook for 60 seconds, stirring frequently. Add the remaining ingredients. Simmer for at least 2 hours. (This made the house smell AMAZING.)
Meatballs:
1 lb lean ground beef (I used 93/7)
7 button mushrooms, diced finely
1/4 sweet yellow onion, diced finely
1/4 cup of Italian style breadcrumbs
1 clove of garlic, minced
1 egg
1 tbsp fresh basil, chopped
1/2 tbsp fresh parsley, chopped
1/2 tsp fennel seed, crushed
Sea salt and fresh cracked black pepper
1 tsp olive oil (for cooking)
Put the onions, garlic and mushrooms in a food processor to chop, otherwise chop them as small as you can. Combine all ingredients (except for olive oil) together gently. Form into small meatballs and set aside. Once the meatballs are prepared. Heat a skillet over medium heat with 1 tsp olive oil. Cook the meatballs until golden brown on all sides. Remove from skillet and place the cooked meatballs in the mushroom marinara.
Hoagie rolls
Mozzarella cheese, shredded
Parmesan cheese, shredded
Fresh basil, chopped
To assemble, place meatballs with some sauce in the hoagie rolls. Sprinkle the top with mozzarella and Parmesan. Place in a pan, under the broiler and melt cheese - watch carefully so don't burn. Top with basil and serve. Enjoy!
Thank you so much for this recipe Pam! It was out of this world...AMAZING!
If I could gush over this sandwich anymore I would. YUM YUM YUM!
Subscribe to:
Posts (Atom)