Friday, February 29, 2008

CHEESY POTATO SOUP

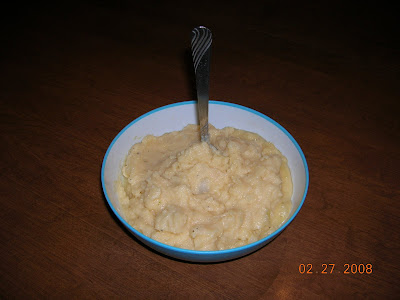
This is my favorite potato soup. I like regular potato soup, but cheesy potato soup is delicious! It's best of course on a cold day, but this soup actually shines on the 2nd day. Left-overs day. You should be able to even see the difference in the bowls of soup. Here's a picture of a yummy bowl of cheesy potato soup on the day I made it. It's nice. It's flavorful. It's kind of a thick soup, you know, not runny like chicken broth, but somewhat thick.


Then here's a picture of a bowl of this very same soup dipped up the following day.
Sitting overnight in the frig it has thickened WAY up. And, all the flavors of sauted onion, garlic, & celery have melded perfectly. Notice how the spoon is standing strait up in the bowl!
And if you don't like it THAT thick, lol, you can stir in some milk.

And one more thing... it's kind of neat how I got this recipe. I got it at a garage sale! LOL
Probably 15 years ago or so, I bought a plastic red recipe box at a yard sale. And it was about half full of some pre-printed recipe cards (I think they were campbell's recipes, but not sure). But it also had some old hand written recipes in there too. I took it up to the lady & asked her if this was a mistake. I didn't want somebody to lose these recipes if they hadn't meant for it to be in the sale. She assured me that she put them in the sale on purpose & the box of recipes was 25 cents. TWENTY-FIVE CENTS! :)
I remember having a lot of fun going thru them. And, that's also where I got my recipe for something called country steak. It's round steak cooked in cream of celery soup. (so I bet those pre-printed recipes were campbell's!)
Anyway, this recipe for Cheesy Potato Soup was on one of the handwritten cards. And it looked pretty old to me, & was written in writing that looks like an older person wrote it, like someone's grandmother. It's probably one of my all time favorite recipes, but definitely my favorite soup recipe! The only change I made to it is that I DOUBLE it. Doubling this recipe feeds a family of 4 for 2 days. The day you make it is great, but the left-over day is out of this world! And usually, there's enough left over to fill a cool-whip bowl & put in the freezer for a rainy-day lunch.

CHEESY POTATO SOUP
1 quart pared, diced potatoes
2 c. water
1 1/2 t. salt
1/2 t. pepper
1/2 c. diced onion
2 stalks of diced celery
2 garlic cloves, minced
1/4 c. butter
3 T. flour
3 c. hot milk
2 c. shredded cheddar cheese
paprika

Cook potatoes in water with salt & pepper until tender. Saute onions, celery, & garlic in butter. Then blend in the flour. Add hot milk, stirring constantly until thick & smooth. Meanwhile, when potatoes are done, smash them up with a potato masher.
(The 1st time I made this I couldn't believe you didn't drain the water. But you don't.)
Just mash them until there are still plenty of chunks of potato, but some thickness too, if that makes any sense. Mine looks like chunky mashed potatoes.) Also add the 2 cups of cheese & stir until melted.
Now add the potato mixture to the sauted mixture. (or the sauted to the potatoes...which ever pan is the largest! lol) Stir well, bring to a simmer, & taste to see if it needs more salt or pepper or any other seasoning. Garnish with paprika.


Also, you can omit the celery or garlic if you don't like these flavors (we LOVE them). And this last time I made it, I forgot to buy celery, so i added about 1/2 t. celery seeds while sauting the onions & it worked fine.
I hope you try it & enjoy it as much as we do!

:)

Wednesday, February 27, 2008

Monday, February 25, 2008

Pumpernickle Rye Bread

I was so anxious to slice into this bread, that I started slicing before I remembered to go get the camera!

1 1/4 cups warm water (110 degrees F/45 degrees C)
1 tablespoon vegetable oil
1 1/2 tablespoons molasses
1 3/4 cups unbleached all-purpose flour (I used bread flour)
1 1/2 cup rye flour
1 teaspoon salt
3 tablespoons dry milk powder
2 teaspoons instant coffee powder
2 tablespoons unsweetened cocoa powder
1 tablespoon caraway seed
1 1/2 teaspoons active dry yeast

(I also add 4 t. vital wheat gluten to the flour)


1. Add the yeast to the warm water & set aside for a few minutes.

2. To a large bowl add: the flours, salt, dry milk powder, instant coffee, cocoa powder, & caraway seed. Stir to mix.

3. Make a well in the middle & add the oil, molasses, & yeast in water.

Stir with a wooden spoon until you can't anymore.

4. Turn out onto the table & knead with flour for 5-7 minutes or so, or until dough is smooth & elastic.

5. Put dough into a bowl with a little oil. Turn the dough around in it to get it coated.

6. Cover with a clean towel & set in a warm place to rise until it has doubled in size, about 1.5 hours.

7. Gently press down on dough to release air. Knead dough for just a few turns. Place in either a greased bread pan, or shape it onto a flat pan. Cover with towel & let rise for 45-minutes or until dough has risen, but not quite to double.

8. If you are using a baking stone, put it in oven & preheat oven to 350 for at least 1/2 hour before baking.

9. Also, if you are using baking stone, score top of bread a few times on the top of the loaf right before putting it in the oven.
10. Put dough in oven & bake for 35-45 minutes. Bread should sound hollow when tapped.

I really liked this bread. I didn't taste the coffee or molasses. And I love caraway seeds in bread. If you don't, you could easily omit them.

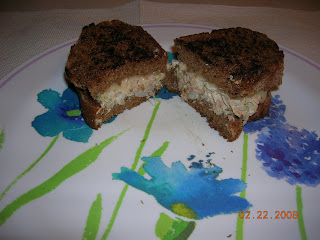
I used this bread to make mexicali tuna melts.
It's not that great of a picture, but it sure tasted good!
The next day I had hard salami on this bread. Yum. :)

Thursday, February 21, 2008

Brown Sugar Cookies

I saw this recipe on America's Test Kitchen on PBS a few weeks ago. It looked so good that I registered at their site in order to get the recipe. When you register, you get 2 free magazines, & they do have a pretty cool site.

These are sugar cookies made with brown sugar. The instructions seem a little overly detailed, but really...it was worth it. These cookies are GOOD. But be warned, they are pretty rich. This recipe calls for making a pretty big cookie (yield for this recipe is just 24 cookies), next time I think I'll make them smaller, since they are pretty rich. The nutty flavor from browning the butter really comes through. It also calls for 1 TABLESPOON of vanilla. Wow. Rich!

(this recipe is copied from America's Test Kitchen site)

Brown Sugar Cookiesfrom the Episode: Cookie Jar Favorites
The most efficient way to bake these cookies is to portion and bake half of the dough. While the first batch is in the oven, the remaining dough can be prepared for baking. Avoid using a nonstick skillet to brown the butter. The dark color of the nonstick coating makes it difficult to gauge when the butter is sufficiently browned. Use fresh brown sugar, as older (read: harder and drier) brown sugar will make the cookies too dry.Makes 2 Dozen Cookies
14 tablespoons unsalted butter (1 3/4 sticks)
1/4 cup granulated sugar (about 1 3/4 ounces)
2 cups packed dark brown sugar (14 ounces)
2 cups unbleached all-purpose flour plus 2 tablespoons (about 10 1/2 ounces)
1/2 teaspoon baking soda
1/4 teaspoon baking powder
1/2 teaspoon table salt
1 large egg
1 large egg yolk
1 tablespoon vanilla extract


1. Heat 10 tablespoons butter in 10-inch skillet over medium-high heat until melted, about 2 minutes. Continue to cook, swirling pan constantly until butter is dark golden brown and has nutty aroma, 1 to 3 minutes. Remove skillet from heat and transfer browned butter to large heatproof bowl. Stir remaining 4 tablespoons butter into hot butter to melt; set aside for 15 minutes.

2. Meanwhile, adjust oven rack to middle position and heat oven to 350 degrees. Line 2 large (18 by 12-inch) baking sheets with parchment paper. In shallow baking dish or pie plate, mix granulated sugar and 1/4 cup packed brown sugar, rubbing between fingers, until well combined; set aside. Whisk flour, baking soda, and baking powder together in medium bowl; set aside.


3. Add remaining 1 3/4 cups brown sugar and salt to bowl with cooled butter; mix until no sugar lumps remain, about 30 seconds. Scrape down sides of bowl with rubber spatula; add egg, yolk, and vanilla and mix until fully incorporated, about 30 seconds. Scrape down bowl. Add flour mixture and mix until just combined, about 1 minute. Give dough final stir with rubber spatula to ensure that no flour pockets remain and ingredients are evenly distributed.


4. Divide dough into 24 portions, each about 2 tablespoons, rolling between hands into balls about 1 1/2 inches in diameter. Working in batches, toss balls in reserved sugar mixture to coat and set on prepared baking sheet, spacing them about 2 inches apart, 12 dough balls per sheet. (Smaller baking sheets can be used, but it will take 3 batches.)


5. Bake one sheet at a time until cookies are browned and still puffy and edges have begun to set but centers are still soft (cookies will look raw between cracks and seem underdone; see photo below), 12 to 14 minutes, rotating baking sheet halfway through baking. Do not overbake.


6. Cool cookies on baking sheet 5 minutes; using wide metal spatula, transfer cookies to wire rack and cool to room temperature.

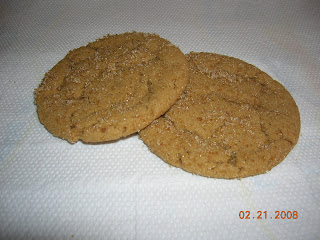
See how big these turn out?!

And now my cookie jar is full. :)


Saturday, February 16, 2008

Polish Sausage Sandwich

This is a really simple sandwich to make. But it is so good!
Butter some deli-style subs & toast them up in the oven.
Cook the polish sausage & in a skillet saute green peppers, onion, & garlic in some olive oil.
Pile onto the bread & enjoy.
I usually make big oven fries with this, but last evening we had sliced pickled beets.
Pretty tasty!


On a side note:
Our computer crashed a couple weeks ago, so we lost ALL of our pictures. Thankfully we had emailed some of our Christmas pictures & both our kids' birthday pictures to family so those got rescued. :) I did have quite a few food pics on there too so I'll be playing catch-up for a while.

Wednesday, February 13, 2008

Sunday, February 10, 2008

Poppyseed Chicken

I got this recipe over at Claire's Cooking is Medicine.

We just tried it the other night & it was really good.

Poppy Seed Chicken
4-6 boneless, skinless chicken breasts, boiled and cubed
1 can 98% fat free cream of chicken soup
1 can 98% fat free cream of mushroom soup
16 oz low fat sour cream

2 Tablespoons poppy seeds
1 sleeve or less Ritz (or other butter style) crackers, smashed
1/2 stick melted margarine

Preheat oven to 350 degrees F. Prepare chicken as directed - I've found the best way to boil chicken is to put it in the water, bring to a boil for a few minutes (less than five), turn off the heat, and let it sit (covered) for a couple of hours; this produces a VERY tender chicken.
In a 13X9 pan, place the chicken. Stir soups and sour cream together in a bowl. Pour this mixture over the chicken. Sprinkle the crackers over the chicken. Now pour the margarine over the crackers or spray with Pam. Sprinkle the poppy seeds over the dish. Bake for 30-35 minutes or until bubbly. You can also prepare and freeze...just wait to put the crackers and poppy seeds on when you are ready to serve it!

Thank you Claire! It was delicious!

(the only thing I did differently was that I did simmer my chicken for about an hour)


I served it with broccoli souffle & corn. (broccoli souffle is one of my all time favorite dishes....I'll post that recipe sometime soon)


Friday, February 8, 2008

Oreck

I want to win this. I never win anything, but I sure would love to win this.
They are giving this away over at 5 Minutes for Mom.
It is called the Oreck XL Ultra.
"This tiny thing is a powerhouse, sucking up filth at the velocity of a cat 2 hurricane AND it has a hypo-allergenic filtration system that eliminates 99.9% of all allergen AND it even lays flat to fit under the bed or furniture."
You can also see an ad for it
here.

I just found out I didn't win the mp3 player.
Winning this would make me feel lots better about that! LOL

Sunday, February 3, 2008

PEPPERMINT PATTY BROWNIES

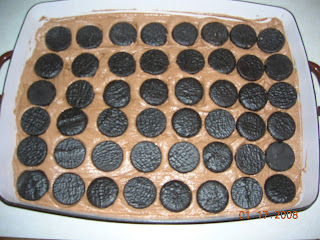
These brownies are so good. You layer about half the brownie mixture, then line up all the peppermint patties you can, & then cover them with the rest of the brownie mixture. Here's a picture taken before I spread the top layer of brownie mixture.
Looking at that, you just KNOW it's going to be good!


PEPPERMINT PATTIE BROWNIES
1 1/2 C butter or margarine
3 C. sugar
5 eggs
1 T. vanilla
2 C. flour
1 C. baking cocoa
1 t. baking powder
1 t. salt
1 package (13 oz.) chocolate covered peppermint patties

In a mixing bowl, cream butter & sugar. Add eggs, one at a time, beating well after each addition. Beat in vanilla. Combine dry ingredients. Add to creamed mixture and mix well. Spread about two-thirds of the batter in a greased 9X13 pan. Arrange peppermint patties over the top. Carefully spread remaining batter over patties. Bake at 350 for 35-45 minutes or until edges begin to pull away from sides of pan & toothpick inserted near the center comes out clean. Top will appear uneven. Cool completely before cutting . Yields 2 - 2 1/2 dozen.


I do have a reccomendation here. I would use York Peppermint Patties. This time I picked up a couple of cheap bags of peppermint patties at the Family Dollar store, figuring it would be fine. But when I started unwrapping them, I did notice that they were quite a bit thinner. York brand is a thicker patty & they hold up better in the brownie. The cheap peppermint patties I used pretty much melted away in this batch, although I did find some in there. In the second picture, you can see just a bit of white from the peppermint patty. They were still absolutely delicious, but I would stick with York brand.
And one more thing, the toothpick NEVER comes out clean for me on this recipe. That's what the origional recipe says, but it never comes out clean. Ever. I bet it's because of the peppermint patties. So I wouldn't use that method to check for doneness, otherwise they'll be overdone.

And I must add that these are great in the morning with hot tea. It's just what I need to get my day started! LOL!