Tuesday, December 30, 2008

Kitchen Tip Tuesday

My kitchen tip this week is what to do with left-over chocolate. LOL That just makes me laugh & say, "Who in the world has left-over chocolate?" LOL
Well, I usually do have a teeny-tiny bit left-over dipping chocolate after I've dipped our peanut butter balls. I only had a small bit, maybe one-forth a cup. It was not enough to do much with, but way too much to just lick the pan. LOL!!!
So, the thing to do is pull out a plate full of pretzels & drizzle the chocolate over them. Don't go through the hassle of dipping each & every pretzel, just drizzle some.
I lined a cookie sheet with parchment paper & then lined the pretzels up close together & then drizzled with a spoon.
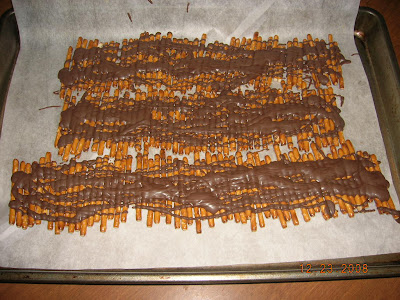
That's quite a few pretzels for just 1/4 cup of chocolate. Yummmmmmm.....here's a close-up:
Once they've hardened you can break them into 2 or 3 pretzel pieces. They looked really nice on the plate with peanut butter balls & Claire's Vanilla Nut Toffee Cookies.

You could also just add any chopped ingredient to the melted chocolate (nuts, crushed candy canes, etc...) & pour it onto some waxed paper to make a small amount of 'bark'. But I think the chocolate stretches further to drizzle the pretzels.

You can see more Kitchen Tip Tuesdays at Tammy's Recipes.

Sunday, December 28, 2008

Touchdown Taco Dip

I can't believe this is the only picture I have of this touchdown taco dip. I have made it enough times that you'd think I'd have a better picture. At least I should have placed some tortilla chips around it. Well, I found this picture & thought it would be a good time to post it. It's a great New Year's Eve dip to have on hand. Everyone always loves it & there's never any left over.
I got this recipe about 10 years ago from one of my babysitting parents. She was selling Pampered Chef on the side, & shared this recipe with me that was in one of her booklets. If I remember right, she had given a Pampered Chef party around super bowl time & this dip was one of the appetizers. So that explains the name of the dip. Although we've never been football fans around here, the name of this dip has stuck.
Touchdown Taco Dip
1 can re-fried beans
1 c. sour cream
1 (8 oz.) pkg. cream cheese
2 T. taco seasoning mix
shredded cheese OR nacho cheese
diced tomatoes
green onions
olives
1. Spread the refried beans in the bottom of a 8x8 pan.
2. In a mixing bowl mix the sour cream, cream cheese, & taco seasoning mix until smooth. Spread this over the top of the refried beans.
3. You can then either sprinkle with shredded cheese or nacho cheese. The origional recipe calls for shredded cheese, but I find this too stringy & we prefer the nacho cheese.
4. Bake at 350 until cheese melts & layers are heated through (about 10 minutes)
5. Remove from oven & sprinkle with tomatoes, onions, & olives.
We really LOVE this dip. It is so easy to make & I usually double this recipe & put it in a 9x13 pan. My friend Dana & her sweet girls enjoyed snacking on this when they came to visit us last summer.
You can click here to see our usual New Year's Eve snacks.

Wednesday, December 24, 2008

Vanilla Nut Toffee Cookies

I chose these cookies that Claire made this last summer for one of our Christmas cookies this year. When I saw them on her blog, I just knew I had to make them sometime. That happens to me a lot! I've learned not to just bookmark a recipe, otherwise I never get back to it. If I know I want to try someone's recipe, I print it out & put it in my "to be baked or cooked" pile. That's a bit like a "to be read" pile for books. LOL So it took me more than 4 months to get around to making them. Oh mercy, they were worth the wait! These cookies are so good! The pecans & the toffee (which was Claire's addition) give them such a good flavor. So I wrote at the top of my recipe that these are called Claire's Vanilla Nut Toffee Cookies. :) Here is a link to her recipe for these cookies.


Vanilla Nut Toffee Cookies adapted from All About Home Baking
1 cup butter or other shortening (I used 1 stick butter, 1/2 cup shortening)
1/2 cup brown sugar, packed
2 cups sugar
2 eggs, well beaten
1 cup pecans, chopped
1 tablespoon vanilla
1 cup toffee pieces
4 cups sifted flour
3 teaspoon baking powder
1/4 teaspoon salt
Cream butter until smooth. Gradually add sugars and cream until fluffy. Add eggs, nuts, vanilla, and toffee (to prevent overmixing later). Sift flour. Add baking powder and salt to it. Then add gradually to butter mixture. The dough will be stiff but not overly so. It can be crumbly but mine was not, it held together well. Split the dough in half. Roll each half into a 1 1/2 inch roll/log and wrap in waxed paper. Chill in refrigerator overnight or in freezer for a few hours if pressed for time (this is what I did). When ready to bake, preheat oven to 425F. Slice into 1/4 inch slices and place on baking sheet. Bake for five minutes or until done. Do not overbake. I recommend taking the cookies out when they are just barely starting to golden up. Let cool on pan for a couple of minutes. Remove to cooling rack for a few minutes. Makes 6-7 dozen.
I didn't change a thing in the recipe. Like Claire, I too used the butter and crisco. Another thing, I thought that 425 sounded really hot for making cookies. I turned my oven to 400, & the cookies did not get done within the 5-6 minutes I gave them. I kept having to give them 1 more minute, then another. So I followed the instructions & turned my oven up to 425. LOL And even after 5 minutes, I still needed to bake mine even 1-2 minutes more. You know how cookies are, you have to really watch them those last few minutes. They can be underdone & then burn within a minute! My rule of thumb is to take them out 1 minute before they "look" done. It's finding that 1 minute before done that's the key. :)
This is one of those recipes that I call a KEEPER.
Thanks Claire!

Tuesday, December 23, 2008

Kitchen Tip Tuesday

My Kitchen Tip Tuesday is a little different this week. I think the only way it relates to the kitchen is that we did this craft IN the kitchen. LOL

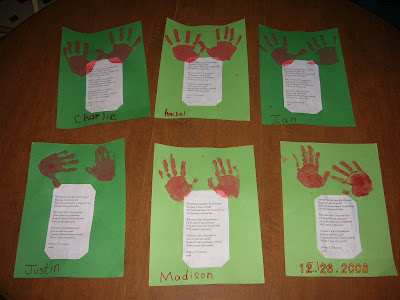
This is the handprint poem with the children's handprints on them.

For those of you who don't know me, I have 5 babysitting kids that come full-time, Monday through Friday. Our son did one of these papers too, he's 5 years old. Our daughter is almost 18, so she didn't make one. LOL However, she did make one when she was around 4 years old. We put it in a picture frame & it is still hanging in my kitchen. :)


We used regular construction paper & washable poster paint. Our daughter typed the poem up on the computer & printed it out for me (she didn't write the poem, just copied it from the paper she had made when she was little). We used Elmer's glue to paste on the poem, & then each child did their hand print. It was a challange, as 3 of the kids are under 2 years old. One of them it took many tries as she wanted to finger paint instead of holding her hands still. LOL I would suggest that you take a couple practice runs on a plain piece of paper first. That's what we did & it really helped. Here is the poem:


Sometimes you get discouraged
Because I am so small
And always leave my fingerprints
One furniture and walls.

But all the time I'm growing~
I'll be grown up some day
And all those tiny handprints
Will surely fade away.

So here's a final handprint
Just so you can recall
Exactly how my fingers looked
When I was very small.


You can find more kitchen tips at Tammy's Recipes.

Sunday, December 21, 2008

The Flavor Bible

I won this book!
Special thanks to my friend Lori,
who directed me over to the book reviewer's blog who was having a drawing for 3 different books. The site is called B&b ex libris. I really enjoyed going through her book reviews. I book marked her site & plan to visit again.
Thank you B&b ex libris, this is the book I was hoping to win!
And to make it even more fun, Lori won the same book!

Thursday, December 18, 2008

Onion Burgers

This is one of those inexpensive & easy to cook meals that is tasty too.

Onion burgers
1 1/2 pounds hamburger
1 pouch Lipton Onion Soup Mix
3/4 C. water
Buns

Brown hamburger, drain well, & return to pan.
Add the soup mix & water. Stir well & simmer for 5 minutes or so.
We like to steam the buns on top of the meat mixture to soften them up a bit. Split the buns & place the inside part down on the meat mixture. Cover to to steam them for about 2 -4 minutes.

Serve with your favorite condiments. I like ketchup & pickles.

Wednesday, December 17, 2008

Wordless Wednesday

Well, one word Wednesday:
COZY.

Tuesday, December 16, 2008

Kitchen Tip Tuesday


My tip this week is how to perfectly cook hard boiled eggs. I don't mean that to sound arrogant, using the word perfect can lead to that assumption, & I don't mean it like that. :)
Years ago I was watching the Food Network & it was back in the day when it was fairly new. I think it was Emeril's first year. He looked right into the camera & said he was going to demonstrate how to perfectly cook a hard boiled egg. So actually, perfect is his word, not mine. LOL
Years ago when I'd make hard boied eggs, the yolk would usually look a little green on the outside part of the yolk. It didn't affect the taste, but who besides Sam I Am wants green eggs? I would tend to over cook the eggs because of being afraid of undercooking them.
But Emeril showed me a trick to fix that green yolk problem. He even asked, "Do your yolks ever come out green when you boil eggs?" LOL That got my attention. I listened to his 'trick' & thought to myself that they'd be undercooked. But I have to say that this trick worked, & I've been boiling my eggs Emeril's way ever since.
To hard boil eggs:
Place eggs in pan & cover with cold water.
Bring to a full boil & boil for only 4 minutes.
Remove from heat & cover with lid.
Let them sit in the coved pan for 9 minutes.
This is what cooks them perfectly.
Then, pour them out into the sink with cold running water. Cool the pan off in the water too. Return the eggs to the pan & fill with cold water & ice.
Crack & peel & eat!
I haven't had a green hard boiled egg in at least 7 years. :)

You can see more Kitchen Tips over at Tammy's Site.

Saturday, December 13, 2008

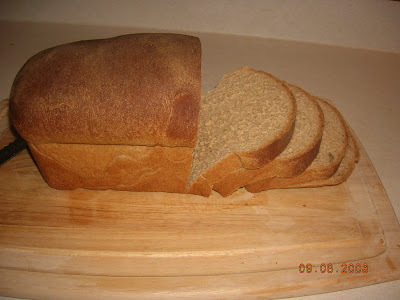
Country White Bread

I used to make this recipe in my bread machine a lot. Lately, I've just been making bread by hand, but I came upon this recipe in my binder, so I thought I'd try it again. It's really a nice white bread. It slices well & has a nice flavor.

Country White Bread
1 C. plus 1 T. warm water
1 egg
4 1/2 t. vegetable oil (I used olive oil)
3 1/2 C. bread flour
1/4 C. sugar
1 1/2 t. salt
2 1/4 t. active dry yeast

If you are using a bread machine, combine all ingredients in the order suggested by the manufacturer of your machine.
If by hand:
Mix the yeast into the warm water & set aside. Combine the rest of the ingredients. Add the water & yeast mixture. Stir with a wooden spoon until you can't anymore & then turn it out onto the table. Use hands to finish mixing & then knead on floured table for 6-8 minutes, or until smooth & 'satiny' feeling.
Put 1 t. oil into bowl & turn the dough to coat it. Cover with a clean towel & put in warm spot to rise for 90 minutes. Punch down & knead for a few minutes. Put it into a greased bread pan, & cover to rise for another 45 minutes. Bake at 350 for 35 minutes.
Please slice while still warm & slather it with real butter. It will make you happy. :)


Here is a really neat tip I learned from reading some of the links on Tammy's Kitchen Tip Tuesdays. I cannot for the life of me remember which site I read it on, or I would give credit where credit is due & link you to her site. The best I can do is say that this tip was linked on Tammy's site sometime within the last 4-6 weeks. Since reading it, I have been using this tip often. The tip was to use those big bags you get in the produce department of the store, those bags you put your onions in, or garlic, or even bananas. They are nice and big & are the perfect size for a homemade loaf of bread!
In the past I have wrapped loaves in plastic wrap, or used an expensive gallon sized zip lock bags. Plastic wrap can be a pain in the neck, & zip lock bags (the giant ones) are just too expensive. These bags you get (for free!!!) in the produce dept. are perfect to put your homemade bread in! I have saved my produce bags from the last two months & I have been using them.
My thanks to the lady who gave this tip! I'm sorry I don't remember which site I found this great tip. These produce bags keep my bread fresh!

Friday, December 12, 2008

Friday Felicities

Peppermint Mocha Coffee Mate, I finally got some!

Finding out that Becky had a successful surgery.

Christmas dishes, my favorite is the snowman tea cup.

My Prayer Shawl

The Christmas tree twinkling in the dark living room in the evening.

Filling one of my empty babysitting spots!

Reading James Michener's Chesapeake I am really enjoying it. Alot.

FRIDAYS


WEEKENDS!!!!!

Sleeping German Shepherds, they're awfully tired. LOL

You can see more Friday Felicities at Becky's site.

Wednesday, December 10, 2008

Freezer Slaw

I have been meaning to post this recipe since July. We used to have freezer slaw while growing up, but I forgot about it. Then a friend (an old babysitting parent) reminded me of that recipe when I told her I had a lot of cabbage in the garden. Here's a nice head of cabbage that came out of our garden back in June.
I have a recipe for slaw that is the kind with mayo. You can have your slaw with or without mayo. The mayo recipe I have is the copy cat recipe for KFC cole slaw. We really LOVE that slaw. Freezer slaw does not have mayo, it has vinegar in it & has that sweet & sour taste.
It is DELICIOUS. Everytime I get some out of the freezer, we eat it up quickly. It's a nice side dish to any meal. I know cabbage is more of a summer produce, but I have bought some on sale at the store lately, so I now I need to make more freezer slaw. I just couldn't pass up a head of cabbage for 49 cents!


Freezer Slaw
2 lbs. cabbage (4 cups)
1 large green pepper
3 large carrots
¾ c. onions, chopped
1 teaspoon salt
2 cups sugar
1 teaspoon dry mustard
1/2 cup water
1 cup vinegar
1 teaspoon celery seed

Shred cabbage, green pepper, and carrots. (I did it in the food processor.) Add onion. Sprinkle with salt; let stand 1 hour. Drain. Combine remaining ingredients in a saucepan. Bring to a boil; boil 3 minutes. Cool. Pour over cabbage mixture; let stand 5 minutes. Stir well. Pack in can or freeze jars or plastic freezer boxes. Seal; label; and freeze. Yield: about 5 pints.


When I ran out of those freezer containers, I used cottage cheese containers that I had washed & saved. I just made sure to write on the lid what it was, otherwise I might pull it out of the freezer & not know, because I have been known to freeze single servings or two servings of stuff (chili, soups, anything really...) in cottage cheese containers. It IS important to label them. LOL

And, here's a neat little thing about cabbage. It is like broccoli in that when you harvest it, you don't uproot the whole plant. You just cut out the head of cabbage & leave the plant there. In a few weeks more little heads will appear & start growning. They are miniature & will not grow to full size, but they are still good. And fun for the kids. Our 5 year old (almost 6 now!) loves to eat baby cabbages.
Here are some baby cabbages we harvested in September.
Aren't they cute?!


I hope somebody makes freezer slaw & enjoys it as much as we do.

Tuesday, December 9, 2008

Kitchen Tip Tuesday


My tip this week is for a fast & easy way to fill deviled eggs.
Put your egg yolk mixture into a pastry bag fitted with a large star tip. That's it. Squeeze the mixture out into each egg. It's really fast-it takes about 30 seconds to do that whole plate- and it makes them pretty too. I use disposable parchment bags, only because that's what I learned on, & clean up is a sinch. You can use a re-usable decorating bag, or even just a zipock bag. You can fill the ziplock bag & snip the corner off & you're good to go.
You don't have to use a star tip, but if you have one, it sure makes them look 'purdy'.
Here's my recipe for deviled eggs:

6-8 hard boiled eggs
2 T. mayo (or more)
a little squirt of mustard
pinch of salt
pinch of sugar

Cut eggs in half, putting the yolk in a bowl & arranging the whites on a plate.
I use the mixer to get the yolks broken down a bit. Add mayo & mustard. I don't really measure the mayo, just 'eyeball it'. Add the salt & sugar & mix with mixer until creamy.
Fill pastry bag & then squeeze it into shells. You can them sprinkle the whole plate with a little pepper (if everyone if your family likes pepper) or sprinkle with paprika.
I don't usually end up doing this anymore. I leave them plain & put pepper & paprika on the table so people can put what they want on individual eggs. That makes everybody happy. :)

Oh! I just thought of another trick. It's a Two for Tuedsay! (snicker)

Here's a nice tip for storing these in the frig without messing up the tops of your deviled eggs.
Take a small drinking cup, either a child's sippie cup, or one of those really short glasses that come in a whole set of glasses. Turn it upside down in the middle of your egg plate. Then cover with plastic wrap. The cup in the middle acts like a sort of tent pole, so it keeps the plastic wrap out of your pretty eggs!
Whew! I thought I was about out of kitchen tips, but there's 2 for ya! :)
And I just thought of another, so I've at least got one more week in me. LOL
You can see more Kitchen Tips at Tammy's Recipes.

Monday, December 8, 2008

Wheat Bread

I got this recipe from Tammy's Recipes about 6 months ago. We really like this recipe & I've made it many times. It is really good!

Homemade Wheat Bread (from Tammy's Recipes)
Yield: 1 loaf
Ingredients:
1 cup warm water (110-115 degrees F)

1 tablespoon milk
2 tablespoons oil
2 tablespoons honey
2 tablespoons brown sugar
1 teaspoon salt
1 1/2 cups all-purpose flour
1 1/2 cups whole wheat flour
2 teaspoons instant active dry yeast
Instructions:
1. *Combine first 6 ingredients in a large mixing bowl; stir.
2. Add flours and yeast, and knead until dough is smooth and elastic, about 10-15 minutes. Place dough in a greased bowl, turning once to grease top. Cover with a clean towel and let rise until doubled, about 40 minutes.

3. Punch dough down; knead for a few minutes until smooth and then form into a loaf. Place in greased loaf pan and cover. Let rise in a warm place until almost doubled in size, about 30 minutes.
4. Bake at 350 degrees for 30-35 minutes. If loaf starts browning too soon, lightly lay a piece of foil on top of the loaf to prevent too much darkening.
5. Remove bread from oven and allow to rest in pan for a few minutes. Remove to a wire rack and cover with a cloth. Slice and enjoy while still warm! Leftover bread can be stored in an airtight bag or frozen until needed.

If you would like your whole wheat bread to have a softer and better texture, you can add these dough conditioning ingredients to this recipe:
3 tablespoons vital wheat gluten (replace 3 tablespoons of the flour called for in the recipe with this)
1/2 teaspoon soy lecithin (we use granules of lecithin, and add it to the water at the beginning)
a pinch of citric acid (use sparingly!!)
a sprinkling of ginger

*The only thing I did differently was that I always add my yeast to the warm water & set aside. Then I combine all the other ingredients. Once I've done that, I add the water & yeast.
I also let it rise 90 minutes for the first rise & an hour (or less) for the second rise.
We really like this bread!
Thanks for another great recipe, Tammy!

Tuesday, December 2, 2008

Kitchen Tip Tuesday

I'm just about out of tips. Everytime I think I don't have any more left, I find myself doing something that I realize would be a nice tip. LOL
I thought the mayo jar lids was my last tip, until the day before Thanksgiving when I was rolling out my pie dough. I got this tip from seeing just a portion of a Martha Stewart show quite a few years ago. I don't think I've ever seen her show, but one time I was flipping channels & there she was having a girl (I think it was her neice) roll out pie dough. It was unusual how she was doing it, so I thought I'd try it, just once. Well, since then (which was about 10 years ago), I use this trick probably 95% of the time!
It's weird, but it does make it easier, & it's simple. I think the trickiest part of doing the pie dough is picking it up after you've rolled it out to put in your pie pan. Sometimes it sticks to the table, even if you've used flour. This trick eliminates that problem. This simple trick is that you put the dough between plastic wrap!

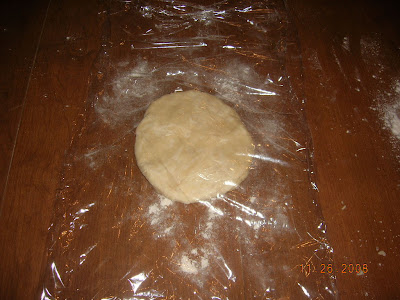
You put down a section of plastic wrap (I call it Saran Wrap, even though I don't use that brand any more), & lightly flour it, & then put your pie dough on it. Pull out another section of plastic wrap & flour it. Turn it flour side down on top of the pie dough. Now, roll out your dough while it is between the plastic wrap. When you're done, remove the top plastic wrap, pick up your dough with the wrap underneath it & flip it over into your pie pan. Then remove that bottom wrap.
Simple & easy.
It's hard to tell in the pictures, but the first picture shows the pie dough between the plastic wrap. This was before I rolled it out.

And this was after I rolled it out.
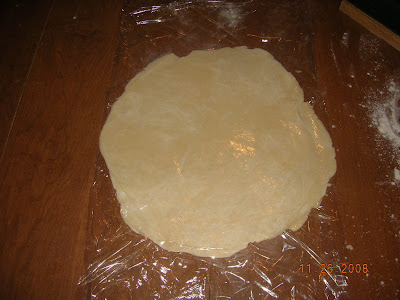
The first time I tried it, it was a little awkard. The next time I did pies, I didn't use this trick & wouldn't ya figure, but I had trouble pealing that pie dough off the table. So I pulled out the plastic wrap & tried it again. I always end up using this method. It does make it easier. I do find that my dough needs to be a little bigger than what the width is on the plastic wrap. But that's ok, when I roll it out it does stick out each side a little bit, but it doesn't hurt a thing.

Here's my pie dough recipe to go with this. It makes two crusts.

2/3 C. plus 2 T. Crisco
2 C. sifted flour
1 t. salt

1/4 C. ice water
Mix together with a fork or pastry cutter the first 3 ingredients until crumbly. Add ice water & stir lightly & quickly. Take out of bowl onto lightly floured surface & mix with hands only until needed. Divide dough in half & roll out each one & put in pie pan.

If you only want 1 crust I found these amounts from another recipe:
1 C flour
1/2 t. salt
1/3 c. crisco
2-3 T. cold water

Make the same as the above recipe.

I found myself doing one more thing that I can think of as a trick & I'll share that one next week. And I just thought of another one, so maybe I'm still good for a couple more weeks on these tips. LOL

See more Kitchen Tips at Tammy's site.