Tuesday, June 30, 2009

Kitchen Tip Tuesdays: Amish Friendship Bread Half Feeding

I thought of another tip. This is about Amish Friendship Bread. You know that starter that someone gives you in a big ziplock bag? You have to "mush" the bag for 5 days, & on the the 6th day you "feed it" 1 cup milk, 1 cup four, & 1 cup sugar. You feed it this same amount of milk, flour, & sugar on day 10, & then it's baking day. After you've "fed" the mixture on baking day, you have 4 new starters, plus 1 cup of batter that you use to make the loaf of delicious cinnamon bread. You usually give 3 starters away to friends, & keep 1 starter for yourself to start all over again (it's day 1 for these starters), & bake one batch of cinnamon bread. It's great...at first. After a few cycles of 10 day periods, you run out of friends to give starters too. Or, all your friends have already had this experience, & they quickly tell you ""NO!" when you offer them a starter. LOL It just gets hard after a while when you can't get rid of, I mean, you can't give away all your extra starters. If you have a hard time wasting things, you end up making several batches of bread on baking day. There are great variations to this recipe so you end up making not just cinnamon bread, but lemon poppyseed muffins, chocolate coffee muffins, caramel apple bread or muffins, & the list goes on & on. It's wonderful to have a freezer filled with so many different kinds of bread & muffins. But it really does make baking day every 10 days a lot of work.

Well, I had a starter in the freezer & I decided to get it out & have another go at it (it had been 3 years since I had done it). After 3 cycles or so I hit that time where I couldn't get rid of my starters anymore. I found a GREAT tip online. I can't find the link now. I was sure I saved it to favorites so I could link to it, but now I can't find it anywhere. You can actually give your bread "half feedings".
Instead of 1 cup each of the flour, milk, & sugar, you can feed it it a half cup of all of those ingredients. And the result? On baking day, you end up with 3 cups, which means you only have 2 starters & then 1 cup to make a batch of bread with. So you can bake 1 batch, save a starter for yourself, & then have 1 starter left over to either give away or just make a second batch.
On baking day I have been making 2 batches. It's not hard to do, I make them both at once. If I make bread, it means 4 loaves of bread. 4 loaves of bread to bake every 10 days is much more managable.
Another tip for this amish bread is that you can use a bundt pan in place of 2 loaf pans. So if you do it that way, every 10 days you make two bundt loaves, & then only 1 starter to keep going.
And when you get tired of it all & you need to stop, just put that 1 starter in the freezer & you can start the whole thing up later.

So if you've done this before & cringe when someone offers you a starter, try giving it another chance & only give your starter half feedings. It works really well & that bread really is so good!
I'm going to start posting some of the variations I'm been making, which can take the form of breads, bundt cakes, muffins, & yesterday I even made cookies.
To see more Kitchen Tips, please visit Tammy's Recipes!

Saturday, June 27, 2009

Deep Fried Potato Wedges

I had never made fried potato wedges. I've just always made potato wedges in the oven & called them oven fries. Oven fries are really good, but sometimes you just need batter covered, deep fried potato wedges. :)
So I searched the net for a batter recipe & found one on Cooks.com. I did alter it a bit by adding seasonings. It calls for 3/4 C. cornstarch & 1/4 C. flour. I was low on cornstarch & didn't use that much, but other recipes I found just called for 1 C. flour, so I think that's what I'll do from here on out. I'm not sure why it called for cornstarch really.
So here's the recipe I'll use, but may add *more* of the different seasonings.

Batter for Potato Wedges

1 C. flour
1/2 t. salt (or more)
1/4 t. peper
1 t. baking powder

1/2 to 1 t. garlic powder
1/2 to 1 t. celery salt

1/2 to 1 t. seasoning salt
1/2 C. water
1 egg, beaten


In a bowl stir together flour, baking powder, & seasonings.
In another bowl stir together the egg & water. Pour into flour mixture & stir until smooth.
Dip vegetables & deep fry.

We really liked these potatoes. I usually use 9 potatoes for our family of four, whether I'm making mashed potatoes, oven fries, & even cheesy potatoes. I don't ever remember deciding on 9 potatoes, but that's what works for us. It makes a nice sized amount, usually with some left-overs for snacking later. And these deep fried potatoes were delicious as left-overs...cold right out of the frig (what little left-overs there were).

I'm going to keep this batter handy. I think it would be great for onion rings, deep fried cauliflower, or anything I can think of to deep fry. LOL

Friday, June 26, 2009

Radish Sandwiches & My Dad

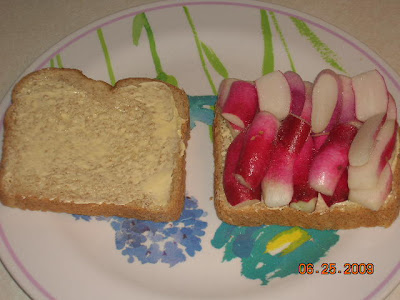
This is one of my all time favorite sandwiches. Our radishes are producing abundantly & I fixed my first radish sandwich of the year yesterday. As I cut the radishes & buttered my bread I thought about my dad. He taught me how to make this sandwich when I was just a kid. We'd butter our bread, add the radishes, shake on some salt, & dig in.

I had some cantaloupe already cut up in the frig, so I added that to my plate. Then I grabbed the quart of pickled beets that I had chillin' in the frig. My mouth watered as I filled my plate, & then I smiled because this was a plate my dad would LOVE. I can still see his eyes light up when I'd bring him out a few quarts of pickled beets. He loved them as much as me. He loved cantaloupe & radish sandwiches were his favorite too.
So as I prepared my plate, I thought about my dad & how many things he taught me besides how to make a radish sandwich (or an onion sandwich, or a tomato sandwich...LOL). On my first day of school in 1st grade, he let me have a piece of gum. I look back at this a wonder, because we hardly ever had gum when we were little kids. Anyway, he gave me this little piece of Trident & told me that they might not allow gum at school. I told him that if they didn't, I'd go right to the trash can & spit it out. (it makes me giggle to remember this) He said, "Oh no. Don't spit it out, that's not very lady-like. Little ladies don't spit their gum out, they take their gum out of their mouths with their fingers, & then throw it away." I can see him kneeling down one one knee & telling me this. It was probably 1971, & he had a crew cut & his hair was already snow white. When on rare occasions I do chew gum (hardly ever) when I go to spit it out I always remember that & I laugh. It's just a silly thing, but it's something I remember from when I was really little, & my dad wasn't just my dad, it was when he was my daddy....& that was so long ago.

I realized yesterday as I was fixing my fun lunch & thinking of my dad, that the next day (today) is the anniversary of his going home to Jesus. He's been gone 3 years now. I hadn't planned on having a radish sandwich & having it turn into a tribute lunch for my dad, but that's exactly what happened. So I looked around for my camera, & set some things next to my plate that Dad would really get a kick out of. I put the big container of radishes near, & my quart of chilled pickled beets, & of course some salt.
If he were here, he would have loved this lunch & thoroughly enjoyed it as much as I did!

Here's to you, Dad!
I am so thankful that God blessed me with you for my DAD.
I sure miss you.
I love you.


Thursday, June 18, 2009

Bride's No-Fail Rolls

I found this recipe for Bride's No-Fail Rolls in an old cookbook titled Blue Ribbon Recipes County Fair Winners. I was looking through old books & came across this one. I kept hesitating before I put it into the "donate" pile. I finally set it aside because I knew I had to go through every recipe before I could let this book go, or I should say IF I could let this book go.
I'm just over half way through this cook book, & it's looking like it won't get donated. LOL I have personalized it by writing in the front cover the page numbers with the names of recipes that I want to try.

This cookbook was published in 1968, & each recipe has a lady's name with it & which county fair she won ribbons for it. For example, Bride's No-Fail Rolls was submitted by Mrs. Joan Deakins, Craig, Colorado, Moffat County Fair. Pretty neat, huh? I thought so too.

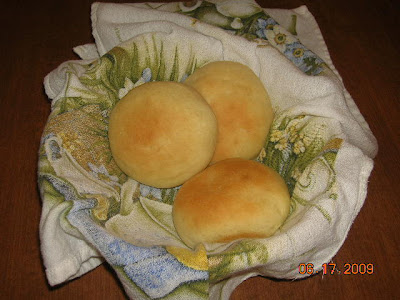
So yesterday I had smoothered chicken in the crockpot & I thought rolls would be good to go with our supper. I've been making breads for a while, but I haven't made rolls in ions. I'm no new bride (our 24th anniversary is in a few months), but since I haven't made rolls in years, I thought this recipe sounded like a good one to start with. And it was! My family loved them.
I wish I would have shaped them a little differently, but they were still really good. I didn't put them in muffin tins, or make cloverleaf rolls with them, I just made balls about the size of golf balls. They came out kind of looking like small buns, but they were so good.

Bride's No-Fail Rolls
1 pkg. yeast (2 1/2 t.)
1 C. warm water
2 eggs, beaten

1/3 C. sugar
1 t. salt
1/3 C. oil
3 1/2 C. flour

Dissolve yeast in water. In large bowl mix eggs & sugar. Add salt. Add oil. Stir in water & yeast. Mix in flour, 1 cup at a time, & stir well. Cover bowl with cloth; let rise until double in size. Punch center to let air out. Make into rolls, & place on lightly greased cookie sheets. Cover & let rise until double in size. Bake at 350 for 10-15 minutes. Yield: 2-3 dozen.

This recipe didn't call for any kneading, so I let the dough rise right in the mixing bowl. The dough is stickier than bread dough, so I put some flour on the table to dust my hands with while I was making the dough shapes.
The size I made (golf ball sized) yielded exactly 2 dozen. I served 1 dozen with our supper & under cooked the other dozen by just 2 or 3 minutes. When they cooled I put them in a large freezer bag & put them in the freezer. When I use them, I'll defrost them & bake them at 350 for maybe 5 minutes, & they'll hopefully be the same as just fresh baked rolls.
I didn't take a picture of my plate, because we were all so hungry we just dug right in.
These rolls are a definite KEEPER.

Saturday, June 13, 2009

Grilled Cabbage

I found this recipe in Country Magazine. I would love to get that magazine, I really enjoyed every single page. I received a free copy in the mail & it was the April/May 2009 issue.

Grilled Cabbage
1 medium head cabbage
1/3 C. butter, softened
1/4 C. onion, chopped
1/2 t. garlic salt
pepper

Cut cabbage into 8 wedges; place on a double thickness of heavy-duty foil (I just used regular foil). Spread cut sides with butter. Sprinkle with onion, garlic salt, & pepper.
Fold foil around cabbage and seal tightly. Grill, covered, over medium heat for 20 minutes or until tender. Open foil carefully to allow steam to escape. Yield 8 servings.

Here's my cabbage just before going on the grill:


And here it is after grilling.

It was delicious!

Thursday, June 11, 2009

Grilled Tilapia with Pineapple Salsa

I got this recipe from the current Taste of Home Magazine (June/July 2009).
It is on page 56 & is listed as "inspected for value: estimated cost per serving as $1.81".
I had never grilled tilapia before, & I had never ever made pineapple salsa before, so I was excited for us to try something new tonight.
Here's a picture of the beautiful & tasty pineapple salsa:

Grilled Tilapia with Pineapple Salsa
2 C. fresh pineapple, cubed
2 green onions, chopped
1/4 C. green pepper, finely chopped
1/4 C. fresh cilantro, minced
4 t. plus 2 T. lime juice, divided (I used lemon juice)
1/8 t. plus 1/4 t. salt, divided
dash cayenne pepper
1 T. canola oil
8 tilapia fillets (4 oz. each)
1/8 t. pepper

In a small bowl, combine the pineapple, onions, green pepper, cilantro, 4 t. lime juice, 1/8 t. salt, & cayenne. Chill until serving.
Combine oil and remaining lime juice; brush over fillets. Sprinkle with pepper & remaining salt.
Coat grill rack with cooking spray before starting grill. Grill fish, cover over medium heat for 3-4 minutes on each side or until fish flakes easily with a fork.
Serve with pineapple salsa.

I served this with grilled cabbage, which was also a new thing for us.


I really liked this. The pineapple salsa was really good! Those flavors just tasted wonderful together. We weren't all of the same opinion on this though. My husband is not really a fan of fish, so he didn't really care for it. Our daughter didn't care for the salsa, but she really liked the fish. She dipped her fish it into a lemon herb tarter sauce. Our 6 year old LOVED it, he had two large helpings of the fish & salsa!

I'll post the recipe for the grilled cabbage next. Because I love cabbage, this was a big hit with me.

Tuesday, June 9, 2009

Kitchen Tip Tuesday

My tip this week is how to keep mashed potatoes warm for supper (or dinner if that's what you say at your house).
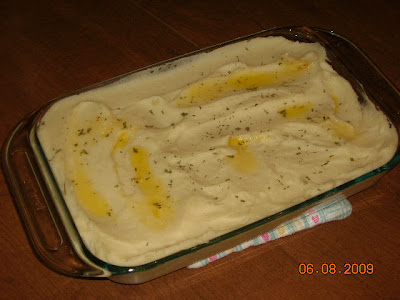
Mashed potatoes cool down quickly, so you usually whip these up last. But, sometimes I mis-figure the time & like this evening, I had my potatoes done way too early. So I put my mashed potatoes into my 7X11 pyrex dish, dotted them with butter, sprinkled on a little parsley (this is optional), & stuck them in the oven at 225 to just keep them warm.
Here they were before going into the oven to keep warm.
And here they are about 15 minutes later after coming out of the warm oven when the rest of the meal was finally ready.

I reckon you could just use the microwave (especially in the summer), but the warm oven does truly keep them warm at an even temperature.
Trick #2 for this is to use your crock pot. I only do this for big dinners like Thanksgiving, but I'll make my mashed potatoes about 30 minutes before serving dinner & then put them on low in the crock pot. This keeps them warm while I'm busy doing other last minutes things, like turkey gravy or noodles. Just don't forget to turn the crock pot off when people start filling their plates, or right after dinner.
You can see more Kitchen Tips over at Tammy's Recipes!

Monday, June 8, 2009

Dill Sub Buns (or country white bread)

Here's just a slightly different recipe than I usually use for sub buns.
I have a recipe for Amish Bread & Country White Bread that are identical except one calls for vital wheat gluten & the other calls for an egg. This is the one that calls for an egg. Plus I had a bunch of dill I just picked from the herb garden so I added a few tablespoons of fresh minced dill.
Here is how I roll them out for longer sub buns. This recipe made 7, plus a small sized one for our 6 year old. Actually, it could have made 8. The buns in the darker tray in the back were a little big. That dark cookie sheet in the back is really old, at least 40 years old anyway. LOL I remember making chocolate chip cookies on it when I was growing up & it was an older one even back then. My mom gave it to me way back, like back in my 20's, & it is one of my favorite. You can see all the lines on it from cutting pizza on it over the years.
Here they are baked. You can see the ones on the tray on the right are a bit too big. I need to remember to make them smaller, actually, I need to make them long & thin like the picture above. That tray turned out nice.

And here's the sandiwch, we had polish sausage sandwiches that night, along with homemade (KFC copy cat) cole slaw. It was so good! Some resteraunts actually serve cole slaw on top of sausage sandwiches. My husband did this and really liked it like that, I like my cole slaw on the side.

Dill Sub Buns (or Country White Bread)

1 C. plus 1 T. warm water
1 egg
4 1/2 t. olive oil
3 1/2 C. bread flour
1/4. C. sugar
1 1/2 t. salt
2 1/4 t. yeast
2 T. fresh dill, minced (optional)

Stir together the water & yeast & set aside. Mix remaining ingredients. Add the water/yeast mixture. Knead with dough hook on mixer for 3 or 4 minutes on low. Or, hand knead for 8-10 minutes. Add a bit of olive oil to a bowl, add dough & turn to coat. Cover & set in warm place for 90 minutes. Punch down. Put in greased bread pan for bread, or for sub buns roll them out long & skinny & place on greased cookie sheet. Cover & rise until doubled, about 45 minutes or so.

For bread, bake about 30 minutes. For sub buns (or even hamburger buns) bake about 15 minutes or so.

I found this picture when I made it as Country White Bread last fall. (Served with light brown beef stew that I haven't posted the recipe for yet.)

Tuesday, June 2, 2009

In Season Recipe Swap

Tammy has a new thing on Wednesdays where you share recipes. She lists each week what the next week's ingredient will be. This week is Strawberries. You can see more recipes for strawberries at her site.
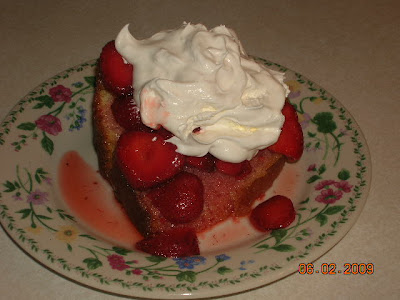
If I can only pick one, that would have to be a simple pound cake, strawberries & their syrup, & whipped cream. This isn't the best picture, but I can't go back & take another picture because the strawberries are all gone!
I love strawberries on pound cake. I used the recipe for pound cake out of my old (from the early 80's) Betty Crocker cookbook
Pound Cake
2 3/4 C. sugar
1 1/4 C. butter or margarine
5 eggs
1 t. vanila
3 C. all-purpose flour (do not use self-rising)
1 t. baking powder
1/4 t. salt
1 C. evaporated milk**
Heat oven to 350. Greas & flour 12 -cup bundt cake pan. Beat sugar, butter, eggs & vanilla in large bowl on low speed scrapping bowl constantly for 30 seconds. Beat on high speed, scraping bowl occasionally, for 5 minutes. Beat in flour, baking powder, & salt alternately with the milk on low speed. Pour into pan.
Bake until tooth pick inserted into the center comes out clean, 70-80 minutes. Cool 20 minutes; remove from pan.
** I didn't have any evaporated milk. I did a search on substitues & there's not really a quick one for evaporated milk. You can't really substitute regular milk, because evaporated milk has about 40% less water in it. I didn't have the time to simmer some of the water out of regular milk, so instead of using a full cup of regular milk, I used just a little more than 3/4 of a cup, & then I added some non-fat dry milk to it to thicken it up just a bit. It worked fine.
The recipe for this pound cake turned out really well. When you buy a pound cake mix, it has much less batter than this recipe. When I've made box mix pound cakes with this bundt pan, the cake is much smaller, much shorter. This recipe makes a nice big, tall bundt cake!

Fresh strawberries on a homemade bundt cake are really good.
We also love strawberries on homemade angel food cake.
I got my tube pan (for the angel food cake) at a yard sale for a quarter.
I got this bundt pan YEARS ago at a yard sale for a nickle!
I'd say those were some good buys!

Kitchen Tip Tuesday

I thought of a new tip. I keep thinking that I'm out of tips, & then I'll think of one more.
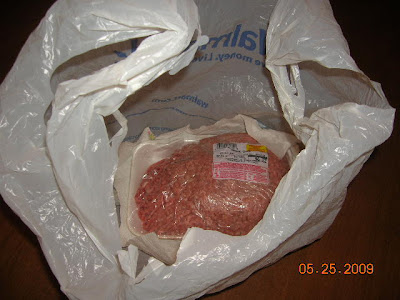
My tip this week is for no mess meat defrosting. Many times I have removed meat from the freezer & just stuck it in the refrigerator to thaw. It's kind of a gamble to do that though, because every now & again the package will leak blood as it thaws. Ewwwww...
An easy fix for this is to put it down in a plastic grocery bag. I know that they sometimes have little holes in the bottom, so sometimes I even double bag it. I also set the meat on a paper towel down in the bag. Double bagging & paper towel usually does the trick! It saves a gross clean up.

To see more kitchen tips, please visit Tammy's Recipes.

Monday, June 1, 2009

Homemade Hamburger Buns (or Amish Bread)

Here's a nice white bread. My recipe card calls it Amish Bread. I have another recipe that's exactly like it except it calls for an egg instead of vital wheat gluten, & it is called country white bread. Both recipes make a nice loaf of bread.

A few weeks ago I had some chicken thawed to make chicken sandwiches. We have two favorites for chicken sandwiches, they are Bacon Chicken Sandwiches & Cajun Teriyaki Chicken Sandwiches. I didn't have any hamburger buns. I had been meaning to try making my own, so here was my chance.
I made the recipe for Amish Bread & after the 90 minutes rise, I rolled the dough into balls. I made a few different sizes, but found that bigger than a golf ball but a little smaller than a tennis ball worked really well.
I covered them & let them rise till double, about 45-60 minutes & then baked them for 15 minutes or so.
Wow! They are so good! I can't even describe how much tastier these are than store bought buns. And really, it wasn't hard to make them AT ALL. I've made them a few times now. We've had them with grilled hamburgers too.
Here's my chicken sandwich with this bun (with oven fries).

They also make great sub buns. My husband said it was the best sub bun he's had yet.
Here it is with a steak sandwich.

Go ahead and make your own buns, you'll be glad you did!
Homemade Buns
1 C. plus 1 T. warm water
4 T. olive oil
3 T. sugar
1 t. salt
3 1/4 C. bread flour
2 t. yeast
3 t. vital wheat gluten (my other recipe does not call for this, but calls for 1 egg)
Stir the yeast into the water & set aside.
Combine other ingredients. Add the water/yeast & stir until blended. If too sticky add a little flour, if too dry, add a few drops of water. Kneed for 8 minutes or so, or use your dough hook on your mixer for a few minutes. Put dough in bowl with a little olive oil. Toss dough to coat, cover & set in warm place to rise for 90 minutes.
Punch the dough down & kneed it a few times on a floured surface. Form into balls for hamburger buns or into a long roll (6 or 7 inches) for sub buns. Cover & let rise 45-60 minutes.
Bake in 350 degree oven for 15 minutes or until lightly brown.
Enjoy!